Let me take you on a journey through the Hypervisor valleys, across the domU PCI NIC pass-through river, that resolves into the land of service coding and dynamic dom0 ip binding.
The long, anti-TL;DR preamble…
Long time readers of this blog, and I mean real long time since my last post is a few years old, know that I’ve worked with hypervisors for quite a bit. What you don’t know is that, contrary to what I mentioned in a previous post, I actually spent the last couple years using a virtual machine as my main desktop environment, and I loved it. But I’m a gamer, and VFIO drivers have problems including heavily suffering from bufferbloat, so I’m planning to go back to bare metal, and that’s the main reason that made me bring in a new server to the house.
I’ve spent the last few years working with different kinds of hypervisors, KVM being the latest for the past year and a half, but all in all no matter the KVM, ESXi and Hyper-V of the world, despite what Citrix did to the poor thing, I missed XenServer the most. So, imagine my joy in realizing XCP-ng existed and that it was good. Marvelous.
So, why did I want a new server to begin with?
Firewall/UTM/Border gateway. I’ve finally been allowed into the realm of gigabit fiber network (been trying and praying and contacting people for the past 17 years), but the modem/router by my ISP obviously sucks. For the same reason ISPs provide upload speed that are 20% your download speed (you must not host your own servers/clouds) they also give you a class /64 IPv6 subnet (YAY!) but the router can’t handle firewalling IPv6, barely straight IPv4 NAT’ting, so if you use IPv6 you’re completely exposed to the interwebs. “Wait, what the actual f***?” I hear you say, and to no one’s surprise, the same thing I asked myself.
I love my 64 GB RAM daily workstation, with all of its 12 cores good-y-ness, but KVM can’t manage it. I’ve been using my main workstation as a Linux HTPC, Windows workstation, and as a multi Linux VM server box. It works great, mostly, but I no longer have any use for the HTPC part of the equation, I have issues with bufferbloat caused by the VFIO drivers, and the PCIe passthrough eats about 10% of my graphic card performance. I have a 1080ti, so that’s no biggie, but all things considered I’d be better offloading the few VMs I run on my workstation elsewhere. I might still try different things with KVM or XCP-ng when my virtual servers are safe on the other machine, but that will go into a new post, eventually.
Big change in the office topology. While for the past 25 or so years everything has always been mostly in a short Cat5 range, now the machines are running on multiple floors. A main server able to serve the needs of everyone in-house and as close to the internet access as possible, is a win-win all around.
These are the main three reasons that made me spend an ungodly amount of money, considering what this server will be required to do. Initially I was hell bent on buying an Intel NUC or some mini box off aliexpress, and I almost did it, but I ended up designing a box with the following features:
- CPU with an Intel GPU. No ROM locking for graphical cards in the first PCIe slot, should I need to upgrade the box for video transcoding or 3D rendering.
- 32 GB of RAM. I had 4x8GB Kingston HyperX Beast laying around doing nothing.
- 5 Intel NICs. 1 onboard, plus a PCIe network card with 4 Intel NICs.
- Full VT-x and VT-d compatibility.
Let’s just say that while I started embracing Jeff Atwood’s idea of the scooter computer, I ended up with a heavy quad which costs three times as much, as per my usual. Again, to no one’s surprise.
So, armed with my quad computer — which incidentally is also quad-core, though hyperthreaded — I installed XCP-ng fairly effortlessly, only to find out that for once in my life everything works, including the second-hand parts I bought on eBay. My, oh my, there’s a first for everything. Well, everything except for the damned Kingston Beast, which won’t work at their labeled clock speed if their life depended on it. But a more relaxed XMP profile fixed that well known issue — G.Skill for LIFE! —.
The server’s network architecture
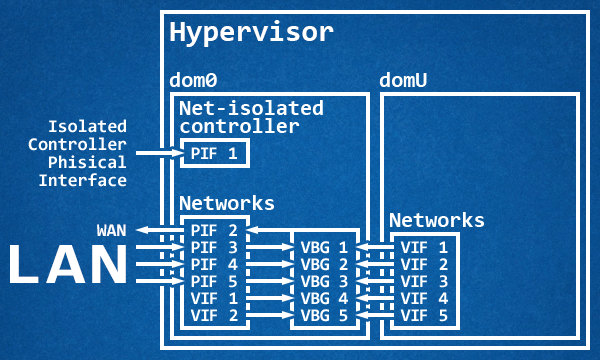
In a typical day of a typical server with a typical configuration, the architecture would look something like this:

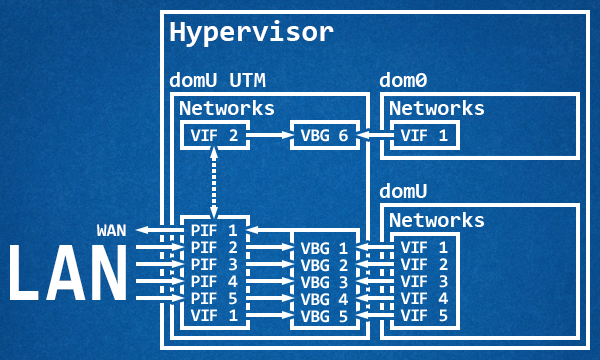
A dedicated physical interface isolated from the rest of the LAN that, at times, is also bridged to the other networks for the traffic portion not inherent to the dom0, while the dom0 manages through virtual bridges the traffic coming from the LAN and from the virtual machines, while at the same time routing everything to the WAN. In this case the dom0 acts as a router, while an eventual domU UTM acts as a service firewall.
Cue in my sweet madness:

Since I wanted to use my NICs to the best of my abilities along with traffic shaping, virtual interfaces aren’t good enough. So, armed with patience and a sprinkle of carelessness and reckless abandon I proceeded through trial and error — mostly locking me outside of the dom0 — to passthrough every single physical NIC to the UTM. I kept one physical interface connected to the dom0 while I was setting up the VM to receive the network cards, and it almost went flawlessly until I inverted the order of operation and rebooted the machine without accepting the changes on the UTM. Oops! Anyway, this setup has several advantages:
- Full control and speed of the Intel NICs straight on the UTM.
- Traffic shaping.
- Tightening up the dom0, which doesn’t have physical access to the network anymore.
- One less layer of communication between the WAN and the domU appliances.
All of these advantages for mostly no disadvantage:
- If the UTM VM goes down, your network is down and so is your access to the dom0.
- Some of the current tools become unusable.
- There is no one to set up the dom0 virtual interface network once everything started.
What’s there not to love?
The passthrough journey
I had my objectives set, and so I started scouring the interwebs for answers. To my surprise the entire proper set up is summarized with six commands tops:
lspci | grep Eth. Find the NIC targets.xe vm-list. Find the target VM UUID./opt/xensource/libexec/xen-cmdline --set-dom0 "xen-pciback.hide=(01:00.0)(01:00.1)(01:00.2)". Enable passthrough on the dom0.xe vm-param-set other-config:pci=0/0000:01:00.0,0/0000:01:00.1,0/0000:01:00.2 uuid=<vm_uuid>. Passthrough the PCI devices to the target VM.
And that’s it with 4 commands. If you’re running something like pfSense, as you can read on this GitHub wiki page, you need to work a little harder since it doesn’t handle well (read, at all) empty checksums on Ethernet packets, so you also need the extra 2 commands:
xe vif-list vm-uuid=<vm_uuid>. Find the virtual interfaces UUID connected to the target VM.xe vif-param-set uuid=<vif_uuid> other-config:ethtool-tx="off". Disable the transfer offload for virtual interfaces.
On pfSense, you will want to increase the performances by paravirtualizing some devices, thus (as you can read here in this Netgate forum post) while on the pfSense VM issue these commands:
pkg install xe-guest-utilities. Install Xen-aware drivers.echo 'xenguest_enable="YES"' >> /etc/rc.conf.local. Enable Xen guest agent.ln -s /usr/local/etc/rc.d/xenguest /usr/local/etc/rc.d/xenguest.sh. Create the link necessary for the service to start at boot.
That’s it, you’re done, you can reboot straight into the VM with hardware NICs passed through. Except that if you do, you’ll lock yourself out of your own server. Fun times!
Coding our way through
The thing that took me the longest to figure out was that for example tools like XCP-ng Center put the host in maintenance mode and then issues a reboot, and after it booted back restores the state in which the host was before maintenance. Except that, if you followed me so far, there’s no going past maintenance mode, because as soon as the UTM goes down so does the link with the dom0, so the server is stuck with all its VMs shut down and sits there wondering what went wrong with its life, questioning its life decisions.
That’s a minor issue, we can still SSH into the dom0 and use xsconsole to do the same thing without locking us out, but it took me a few tries and some reverse engineering to figure out that no, some of the XCP-ng Center features are 100% unusable in this scenario. You know what? It’s ok, I can live with that.
What I can’t live with is a dom0 perpetually out of reach, so I headed out to Server Fault to find people who actually knew better than me. Surely I’m not the first to encounter this problem, right? The silence was deafening.
“Well,” I told myself, “explorer of the unknown is my middle name” — and what a strange middle name to give your first born — so I started hacking something up. I was tentatively crafting something in bash script, but I soon realized that it was more trouble than it was worth. I also found out that I had two tools at my disposal on the dom0:
- Python 2.7.
- XenAPI python module.
This is when I struck gold. Through time-vm-boots.py and monitor-unwanted-domains.py I figured out that I would have been perfectly able to start a service, let it sit there, and dynamically attach an IP to the virtual interface that spawned with the VM. Easier said than done, but possible.
So, armed with the XenAPI documentation for virtual machines, virtual interfaces, networks, and later physical block devices, I crafted my own service.
The only thing left to do was let it start at boot, but no amounts of crontab seemed to work, so I decided to make it into a fully-fledged service with the help of systemd. Except, of course, for the fact that the last time I set up a service like this was many, many moons ago. But this is why we have the interwebs, innit? So I took it to the HTML’d systemd man and to RedHat systemd training material, and my eyes feasted on the latter, because it was actually formatted for humans.
A few tests, commits, and times locking myself out later, I finally had a service worth using at my disposal. It isn’t perfect, there’s (at the time of writing) no native python way coded in to ping v6 targets, and there’s no way to unlock a currently running dom0 which went in maintenance mode, but it grew way more than anticipated, and works fantastically well.
17:15:36 xcp vipb.py: Initialised to add v4 192.168.0.2/24 via 192.168.0.1 to
pfSense's network dom0 using /usr/sbin/ip (XAPI timeout: 30.0s)
17:15:36 xcp vipb.py: Adding 192.168.0.2/24 to xapi1
17:15:36 xcp vipb.py: Adding default route via 192.168.0.1
17:16:19 xcp vipb.py: Plugging SR "ISO Repository"'s cifs "//192.168.0.3/ISO" PBD
I’ll link you back to the vif-ip-binder project on GitHub, with full sources and a bit of technical details, in case you previously overlooked it in the article. And with this, just like Chamber sang, our journey finally ends, a tale of true love.