In this very short post we’ll take a look at how to properly set up your environment to allow you working with your local IDE to a remote server.
Identity files
Since you’re logging through an identity file — because you’re not logging in with a password now, are you? — we need to bind a specified host to a user and identity file, also known as OpenSSH private key. To do so we modify or create ~/.ssh/config or %UserProfile%\.ssh\config on Windows. The file structure is pretty simple:
Host <ip/hostname>
	User <username>
	IdentityFile <PEM file path>
With that information saved, we can simply ssh <ip/hostname> to remote in, without specifying anything.
Identity passphrase
The next problem in our automation process is to store the passphrase for the session, to avoid manual prompts each time we start a remote instance of VSCode. In order to do this we need to ensure that ssh-agent is running properly. On Windows it’s enough to make sure that the “OpenSSH Authentication Agent” service is running, while on Linux it depends on the distro. Generally, we can make sure that it’s running by issuing ps x | grep ssh-[a]gent, and running ssh-agent once if it’s not.
Now we can simply ssh-add <PEM file path>, insert our passphrase, and ssh with reckless abandon.
Visual Studio Code
The majority of the work has now been done, we can simply install the Remote Development extension, and to remote in we select “Remote SSH: Connect to Host…” from the command palette, or press on the little green area in the bottom left part of the status bar.
From there we just “Open folder” and navigate the remote server directory structure, open where we want and code at leisure.
While testing logins on my Rails app, I’ve started hitting a lot of InvalidAuthenticityToken errors which were quite bothering…
ActionController::InvalidAuthenticityToken in DeviseInvitable::RegistrationsController#create
Every endpoint I tried resulted in the IAT error, and everywhere I looked were horrible answers such as “disable security for this method”, “disable security for that method”, so on and so forth. In between the plethora of suggested exploitation vectors, I’ve found an incorrect answer on StackOverflow, that lead me to the true gold.
Chances are that if you’re using Rails 6 with Devise, most of the configurations are correct and safe by default, which probably means that just like me you’re using a reverse proxy for caching and SSL wrapping. As it turns out, without the proper additional parameters forwarded by Nginx, Rails will return IAT every single time even when all parameters are set. Your tipical configuration:
A few months ago I took a few Ruby and Railscourses on Codecademy, just for the sake of learning something new, and I was quite impressed with the language and its beauty. While it has some scalability drawbacks, I found a perfect compact use for a RoR application as a tiny multi-purpose ACL application auth server. A few months later I started setting things up and boy, is it currently a mess documentation wise. So I decided to write down background, documentation and tidbits for both myself and my fellow readers who want to give it a spin for fun.
Getting frustrated with Rails
While the official guide does a good job introducing the base mechanics, if your projects deviates immediately after the creation of the project, you’re in a world of hurt. Since Rails 6, webpack became default, and without a proper configuration not even the default application won’t work.
Then there’s the issue with the many ways to Authenticate with Rails. Given the chance, instead of rolling my own I decided to go with Devise, mostly due to the availability of things like pwnd-password amongst its extensions.
Finally there’s a choice to be made: do we want to get Bootstrap from the chain or do we want to adapt with webpack? I chose webpack for no reason in particular. Mostly to tinker with it.
Installing the basics
Depending on what you read and where you look, different packages are recommended or suggested for compilation or installation. I don’t like to waste time, so I’ll give you the rundown:
rbenv (usermode): allows usermode installation of ruby deployments and multiple separated versions, neat if you don’t want to install everything globally
nodejs (I went with the most up to date, currently 13)
yarn (to grab js packages)
MariaDB-devel and MariaDB-shared (to use MySQL instead of SQLite)
I used rbenv-installer to bootstrap the initial ruby environment, it works great, and I would also suggest installing the rbenv-update plugin which can come in handy.
To get started with rails, we need to install the ruby and rails we want, and it’s fairly easy:
$ rbenv install <version>  # 2.7.5 as of today
$ gem install bundle rails
$ rails new <projectName> [-d mysql]
$ cd <projectName>
Adding Devise and some extensions
Inside the project directory, on top of all the files you will find, in order to setup additional gems to be used and updated in Rails, we will need to edit the Gemfile to add a few things. I chose the following:
gem 'devise'
gem 'devise-pwned_password'         # Pwnd Password db check
gem 'devise-security'               # Security features
gem 'devise_invitable', '~> 2.0.0'  # Invite by e-Mail
gem 'devise_uid'                    # UID instead of ints
Installing devise can be done with the command rails generate devise:install. With the server started, pointing at <scheme>://server/users/sign_in should show you a login form. If it doesn’t, chances are Rails might be stopping you due to a security feature, in which case you need to editconfig/environments/development.rb and add the line config.hosts << "<your_server_hostname>" to it.
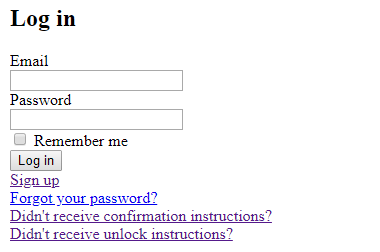
Devise sign_in view
Configuring Devise along with its extensions will take quite some time, and for the sake of brevity I’m not going into it now, but could be a topic for another day. In any case I left links above to the documentation of everything that’s talked in this post, and you also have a lot of config files to read and edit, starting from config/initializers/devise.rb.
Webpack(er) and Bootstrap
If you’re starting straight with Rails 6 then you’re already set up properly with webpacker, otherwise you’ll need to run rails webpacker:install. But we still lack Bootstrap at this point, so we instruct yarn:
jQuery and Popper are necessary to Bootstrap, while I personally installed expose-loader to expose some JavaScript objects provided with Webpack to the DOM. This can be done to access them from the browser console or as a way to gradually move away from the standard rails chain to webpack deployment, without having to rewrite working portions of the web application. In my case I chose this option because I quite like to tinker from the console browser. Also, expose-loader doesn’t do things automatically, so you can programmatically expose in development only, there’s no harm in that.
Now that it is installed, we need a few more steps to integrate its core files into our project. Start by creating the app/javascript/stylesheets directory with an application.scss inside it. Yes, we’re going to place Sass/Scss files inside the javascript directory, because that’s how webpack rolls. In it we put but one tiny line:
The only thing left to do is import the JavaScript components and the stylesheet(s) for webpack to… well… pack. That is done in app/javascript/packs/application.js:
// Import Bootstrap JS & CSS and expose $, jQuery and Popper
require("bootstrap")
import 'stylesheets/application'
require("expose-loader?$!jquery")
require("expose-loader?jQuery!jquery")
require("expose-loader?Popper!popper.js")
It’s now time to reload the page and enjoy the victory.
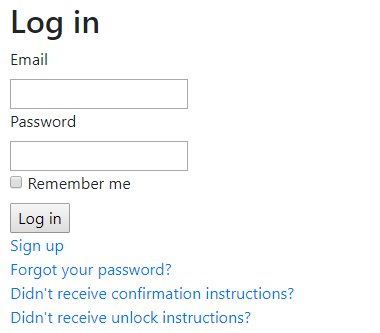
Devise sign_in view with Bootstrap
The building blocks are now all in place, and all that’s left is to code everything else.
If you installed both Ruby and Rails using rbenv, then updating will be a breeze… more or less. Before updating anything though, install the plugin rbenv-updater if you didn’t already.
Updating and installing the new ruby version is quite easy:
> rbenv update
> rbenv install -l | grep ^[0-9]
list of Ruby versions
> rbenv install -v <version>
From within your rails project update the files .ruby-version and Gemfile with the appropriate ruby version, and if you’re doing a rails upgrade as well update the Gemfile accordingly. Then issue the commands:
> bundle update --bundler
> rails app:update
file checks will be needed here
Start your server with puma or rails s and check that everything is working properly. If you need to downgrade due to troubles, you can revert the version changes in the files, delete the Gemfile.lock if needed, issue a bundle uninstall which will end quickly, and you’re done. No harm, no foul.
Let’s face it: SMB/CIFS comes in handy plenty of times. Works great under Linux, works great with Windows, and if it’s configured properly it’s fun times for everyone. There are multiple potential behavioural problems though, mostly involving charsets.
Samba charset (and filesystem) setup
While I’ve been successfully using iso-8859-1 by default for a long time in my Samba servers, until recently I also used the same charset in the *nix filesystem, which brought all kind of oddities. 20/20 hindsight, as per usual. In smb.conf, you can configurn though you can specify different charsets to make everyone happy:
[global]
dos charset = iso-8859-1
unix charset = utf-8
preserve case = yes
short preserve case = yes
default case = lower
case sensitive = no
This has multiple advantages:
Windows gets its iso-8859-1 charset, and is happy;
Linux gets its utf-8 charset, and is happy;
preserve cases make sure that filenames aren’t changed while moving files across machines;
disabling case sensitive avoid weird behaviour under Windows.
This is the configuration I’ve been running for years, sharing files across Windows/Linux/OS X machines since Windows XP, and has been working perfectly.
Changing filesystem charset
If you’re switching the unix charset though, you might need to convert existing files/directories to the new charset. Cue in convmv:
With this simple command I was able to mass rename thousands of files in one go. Note that you also need the --notest parameter to actually apply the changes, and not just list the files in a dry run.
SELinux
While playing around Centos I stumbled into SELinux problems I wasn’t prepared for. Consider the following:
[Share]
comment = Personal share
path = /home/<username>/share/
guest ok = no
browseable = yes
writable = no
create mask = 0660
directory mask = 0775
write list = <username>
Supposing the path actually exists, that the username is added to the samba user database and that the password is correct, everything should work fine. Except that it mostly likely won’t, because we need to configure SELinux on top of everything else:
That’s all there is to properly setup and have the content accessible. Contrary to what other people claims, you don’t have to increase permissions in the samba path tree. A 0700 on the /home/<user> works perfectly fine.
Today we continue the saga of things I was supposed to write down but didn’t, for reasons unknown. Suppose you migrated your OSSEC management server, or freshly installed what will be the new manager on a new OS. You import the keys, as described in my previous post, but the connection fails for one or both of these reasons:
ossec-remoted(1403): ERROR: Incorrectly formatted message from '<client_ip>'. – Pick your own adventure-style error message.
This has happened several times over the course of the last decade, due to client/server version mismatch, drive failures, and what have you. There’s a pretty brute-force way to solve these problems, though:
stop both server and client;
on the client, delete everything inside /var/ossec/queue/rids;
reimport the key on the client (unsure if this step is really needed);
start the server;
test that the client is working, via ossec-agentd -d -f.
if the client is working, start the service.
That’s it. There’s nothing that a good ol’ rm -rf * can’t solve.
Today I started searching for an old article of mine in regard to guest Windows VMs and the troubles with pass-through Nvidia cards. Picture me surprised when I found out that I never actually posted it, although the article has been in the back of my mind for the past two years or so. So, I’ll write it right now, since it contains valuable information that might help some people.
PCI pass-through
There are only a handful of problems with PCI pass-through of video devices:
manufacturers are dicks. You can’t pass-through the first graphic card on consumer devices, because reasons. If you buy a workstation grade with the same hardware though, we’ll allow it.
Nvidia is a dick. If the drivers on the guest sniff out that you’re running within a hypervisor, they won’t work. At all. They refuse to load.
Nvidia is a dick. Although every card supports MSI mode as a replacement for line-based mode, every single time you install the drivers the MSI mode gets reset, as only the workstation/server grade drivers flag the system about message mode. You’re not using the card in a guest machine after all, right? Right?
So, here are fixes for the problems above, same numerical order:
none. The best thing you can do is have GPU capabilities in the CPU. This could/should work (untested).
there are ways to “unflag” a guest machine from the dom0. On KVM through QEMU you can specify a `kvm=off` for the CPU, or edit the machine with `virsh edit`.
after the drivers are installed you can manually edit the Windows registry to enable MSI (also needs a reboot).
MSI and you
There are various arbitrary sources that can tell you why MSI is better than the default line-based counterpart, but when it comes to virtualization I can tell you the top reason why you want to switch to MSI: line-based is unstable. I’ve used my virtualized main workstation/gaming station for a while now, and the only times video card had troubles or the entire VM crashed, was because something between the drivers and the pass-through of the IRQ interrupts in line-based mode failed hard. Since the discovery of MSI I stopped having issues with the video card and everything runs butter smooth.
So, to recap:
Audio coming from the video card crackling? Switch to MSI.
Guest O/S crashing? Switch to MSI.
Video drivers throwing a fit? Switch to MSI.
Bored? Switch to MSI.
Switch to MSI.
Enable MSI
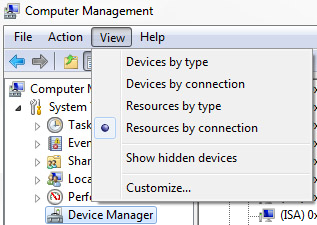
Checking is fairly simple, just open Computer Management’s Device Manager, and check if the NVIDIA Geforce <whatever> and the relative High Definition Audio Controller have a positive or negative value.
List by connectionLine-basedMSI based
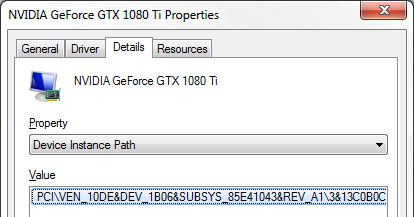
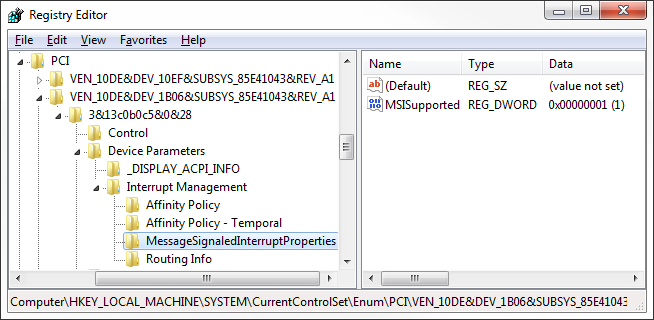
If the value you see is greater than zero, you should switch to MSI. In order to do that, you need to open the device properties and find the device instance path:
With that in hand, you can open HKEY_LOCAL_MACHINE\SYSTEM\CurrentControlSet\Enum\PCI path in the registry, and follow the device instance path to find the following:
With MSI disabled you will notice that the MessageSignaledInterruptProperties key is missing, as you will need to create it along with the DWORD MSISupported set to 1.
That’s all there is to it. You can now reboot the system and the drivers will use MSI mode. Any audio crackling coming from the monitors will be gone, and everyone will rejoice.
Wrangling obscure OpenSSL functions to create and publish SSL certificates has always been kind of a mess. If you want(ed) to create a valid self-signed certificate for multi domains or, at least, example.comandwww.example.com, you most likely were out of luck.
You have multiple paths of the same website to cover for, but a single CN. If you use example.com then www.example.com will result in invalid SSL certificate, and vice versa. Suppose you have the following domain names:
example.com
www.example.com
*.user.example.com
In such a scenario there is no real victory no matter what you choose to use as a CN: the most used wildcard CN, *.example.com, is of no use either because it matches with www.example.com and user.example.com, but not with username1.user.example.com. The only way to address all these issues is to create and sign a X.509 v3 SSL certificate, to allow SAN. The SAN extension has been introduce to resolve all of these problems, allowing the validity of multiple domains/subdomains within the same certificate.
Creating the certificate
We have to start by creating an alternative configuration file to use with OpenSSL, and list the server names we need. As mentioned below we also have to enable the usage of v3 extensions.
# mkdir certificates
# cd certificates
# cp /etc/ssl/openssl.cnf ./example-com.cnf
In the default file, parameters such as req_extensions and keyUsage are commented out, while subjectAltName is missing. We have to add it to v3_req and v3_ca, and create the respective section. It can be created anywhere in the file, but it is generally appended to the bottom. Since the CN is (or, at least, should be) ignored in the presence of SAN, we insert all the names in the alt_names field.
With the configuration in place we can now create the certificate:
The deviation from the standard procedure is the addition of the v3 during the CA sign. We do this by using -extfile example-com.cnf to use the custom configurations, and specifying -extensions v3_ca to make sure SAN are passed through and saved in the signed certificate.