Category Archives: SysAd

Auto IP assignment to a dom0 virtual interface

Let me take you on a journey through the Hypervisor valleys, across the domU PCI NIC pass-through river, that resolves into the land of service coding and dynamic dom0 ip binding.

The long, anti-TL;DR preamble…

Long time readers of this blog, and I mean real long time since my last post is a few years old, know that I’ve worked with hypervisors for quite a bit. What you don’t know is that, contrary to what I mentioned in a previous post, I actually spent the last couple years using a virtual machine as my main desktop environment, and I loved it. But I’m a gamer, and VFIO drivers have problems including heavily suffering from bufferbloat, so I’m planning to go back to bare metal, and that’s the main reason that made me bring in a new server to the house.

I’ve spent the last few years working with different kinds of hypervisors, KVM being the latest for the past year and a half, but all in all no matter the KVM, ESXi and Hyper-V of the world, despite what Citrix did to the poor thing, I missed XenServer the most. So, imagine my joy in realizing XCP-ng existed and that it was good. Marvelous.

So, why did I want a new server to begin with?

Firewall/UTM/Border gateway. I’ve finally been allowed into the realm of gigabit fiber network (been trying and praying and contacting people for the past 17 years), but the modem/router by my ISP obviously sucks. For the same reason ISPs provide upload speed that are 20% your download speed (you must not host your own servers/clouds) they also give you a class /64 IPv6 subnet (YAY!) but the router can’t handle firewalling IPv6, barely straight IPv4 NAT’ting, so if you use IPv6 you’re completely exposed to the interwebs. “Wait, what the actual f***?” I hear you say, and to no one’s surprise, the same thing I asked myself.

I love my 64 GB RAM daily workstation, with all of its 12 cores good-y-ness, but KVM can’t manage it. I’ve been using my main workstation as a Linux HTPC, Windows workstation, and as a multi Linux VM server box. It works great, mostly, but I no longer have any use for the HTPC part of the equation, I have issues with bufferbloat caused by the VFIO drivers, and the PCIe passthrough eats about 10% of my graphic card performance. I have a 1080ti, so that’s no biggie, but all things considered I’d be better offloading the few VMs I run on my workstation elsewhere. I might still try different things with KVM or XCP-ng when my virtual servers are safe on the other machine, but that will go into a new post, eventually.

Big change in the office topology. While for the past 25 or so years everything has always been mostly in a short Cat5 range, now the machines are running on multiple floors. A main server able to serve the needs of everyone in-house and as close to the internet access as possible, is a win-win all around.

These are the main three reasons that made me spend an ungodly amount of money, considering what this server will be required to do. Initially I was hell bent on buying an Intel NUC or some mini box off aliexpress, and I almost did it, but I ended up designing a box with the following features:

  • CPU with an Intel GPU. No ROM locking for graphical cards in the first PCIe slot, should I need to upgrade the box for video transcoding or 3D rendering.
  • 32 GB of RAM. I had 4x8GB Kingston HyperX Beast laying around doing nothing.
  • 5 Intel NICs. 1 onboard, plus a PCIe network card with 4 Intel NICs.
  • Full VT-x and VT-d compatibility.

Let’s just say that while I started embracing Jeff Atwood’s idea of the scooter computer, I ended up with a heavy quad which costs three times as much, as per my usual. Again, to no one’s surprise.

So, armed with my quad computer — which incidentally is also quad-core, though hyperthreaded — I installed XCP-ng fairly effortlessly, only to find out that for once in my life everything works, including the second-hand parts I bought on eBay. My, oh my, there’s a first for everything. Well, everything except for the damned Kingston Beast, which won’t work at their labeled clock speed if their life depended on it. But a more relaxed XMP profile fixed that well known issue — G.Skill for LIFE! —.

The server’s network architecture

In a typical day of a typical server with a typical configuration, the architecture would look something like this:

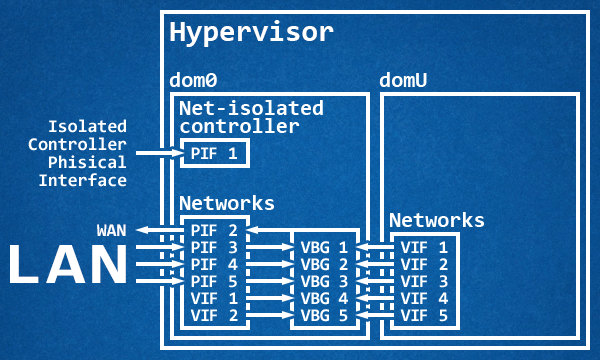
A dedicated physical interface isolated from the rest of the LAN that, at times, is also bridged to the other networks for the traffic portion not inherent to the dom0, while the dom0 manages through virtual bridges the traffic coming from the LAN and from the virtual machines, while at the same time routing everything to the WAN. In this case the dom0 acts as a router, while an eventual domU UTM acts as a service firewall.

Cue in my sweet madness:

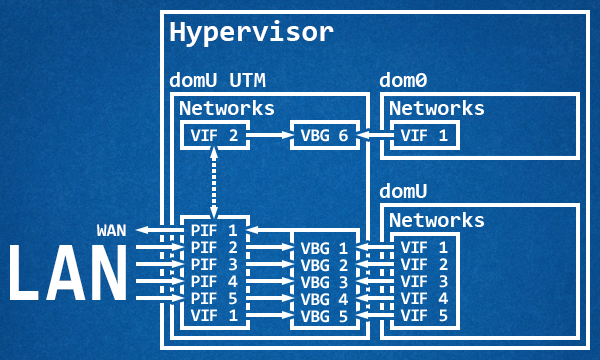
Since I wanted to use my NICs to the best of my abilities along with traffic shaping, virtual interfaces aren’t good enough. So, armed with patience and a sprinkle of carelessness and reckless abandon I proceeded through trial and error — mostly locking me outside of the dom0 — to passthrough every single physical NIC to the UTM. I kept one physical interface connected to the dom0 while I was setting up the VM to receive the network cards, and it almost went flawlessly until I inverted the order of operation and rebooted the machine without accepting the changes on the UTM. Oops! Anyway, this setup has several advantages:

  • Full control and speed of the Intel NICs straight on the UTM.
  • Traffic shaping.
  • Tightening up the dom0, which doesn’t have physical access to the network anymore.
  • One less layer of communication between the WAN and the domU appliances.

All of these advantages for mostly no disadvantage:

  • If the UTM VM goes down, your network is down and so is your access to the dom0.
  • Some of the current tools become unusable.
  • There is no one to set up the dom0 virtual interface network once everything started.

What’s there not to love?

The passthrough journey

I had my objectives set, and so I started scouring the interwebs for answers. To my surprise the entire proper set up is summarized with six commands tops:

  • lspci | grep Eth. Find the NIC targets.
  • xe vm-list. Find the target VM UUID.
  • /opt/xensource/libexec/xen-cmdline --set-dom0 "xen-pciback.hide=(01:00.0)(01:00.1)(01:00.2)". Enable passthrough on the dom0.
  • xe vm-param-set other-config:pci=0/0000:01:00.0,0/0000:01:00.1,0/0000:01:00.2 uuid=<vm_uuid>. Passthrough the PCI devices to the target VM.

And that’s it with 4 commands. If you’re running something like pfSense, as you can read on this GitHub wiki page, you need to work a little harder since it doesn’t handle well (read, at all) empty checksums on Ethernet packets, so you also need the extra 2 commands:

  • xe vif-list vm-uuid=<vm_uuid>. Find the virtual interfaces UUID connected to the target VM.
  • xe vif-param-set uuid=<vif_uuid> other-config:ethtool-tx="off". Disable the transfer offload for virtual interfaces.

On pfSense, you will want to increase the performances by paravirtualizing some devices, thus (as you can read here in this Netgate forum post) while on the pfSense VM issue these commands:

  • pkg install xe-guest-utilities. Install Xen-aware drivers.
  • echo 'xenguest_enable="YES"' >> /etc/rc.conf.local. Enable Xen guest agent.
  • ln -s /usr/local/etc/rc.d/xenguest /usr/local/etc/rc.d/xenguest.sh. Create the link necessary for the service to start at boot.

That’s it, you’re done, you can reboot straight into the VM with hardware NICs passed through. Except that if you do, you’ll lock yourself out of your own server. Fun times!

Coding our way through

The thing that took me the longest to figure out was that for example tools like XCP-ng Center put the host in maintenance mode and then issues a reboot, and after it booted back restores the state in which the host was before maintenance. Except that, if you followed me so far, there’s no going past maintenance mode, because as soon as the UTM goes down so does the link with the dom0, so the server is stuck with all its VMs shut down and sits there wondering what went wrong with its life, questioning its life decisions.

That’s a minor issue, we can still SSH into the dom0 and use xsconsole to do the same thing without locking us out, but it took me a few tries and some reverse engineering to figure out that no, some of the XCP-ng Center features are 100% unusable in this scenario. You know what? It’s ok, I can live with that.

What I can’t live with is a dom0 perpetually out of reach, so I headed out to Server Fault to find people who actually knew better than me. Surely I’m not the first to encounter this problem, right? The silence was deafening.

“Well,” I told myself, “explorer of the unknown is my middle name” — and what a strange middle name to give your first born — so I started hacking something up. I was tentatively crafting something in bash script, but I soon realized that it was more trouble than it was worth. I also found out that I had two tools at my disposal on the dom0:

  • Python 2.7.
  • XenAPI python module.

This is when I struck gold. Through time-vm-boots.py and monitor-unwanted-domains.py I figured out that I would have been perfectly able to start a service, let it sit there, and dynamically attach an IP to the virtual interface that spawned with the VM. Easier said than done, but possible.

So, armed with the XenAPI documentation for virtual machines, virtual interfaces, networks, and later physical block devices, I crafted my own service.

The only thing left to do was let it start at boot, but no amounts of crontab seemed to work, so I decided to make it into a fully-fledged service with the help of systemd. Except, of course, for the fact that the last time I set up a service like this was many, many moons ago. But this is why we have the interwebs, innit? So I took it to the HTML’d systemd man and to RedHat systemd training material, and my eyes feasted on the latter, because it was actually formatted for humans.

A few tests, commits, and times locking myself out later, I finally had a service worth using at my disposal. It isn’t perfect, there’s (at the time of writing) no native python way coded in to ping v6 targets, and there’s no way to unlock a currently running dom0 which went in maintenance mode, but it grew way more than anticipated, and works fantastically well.

17:15:36 xcp vipb.py: Initialised to add v4 192.168.0.2/24 via 192.168.0.1 to
                      pfSense's network dom0 using /usr/sbin/ip (XAPI timeout: 30.0s)
17:15:36 xcp vipb.py: Adding 192.168.0.2/24 to xapi1
17:15:36 xcp vipb.py: Adding default route via 192.168.0.1
17:16:19 xcp vipb.py: Plugging SR "ISO Repository"'s cifs "//192.168.0.3/ISO" PBD

I’ll link you back to the vif-ip-binder project on GitHub, with full sources and a bit of technical details, in case you previously overlooked it in the article. And with this, just like Chamber sang, our journey finally ends, a tale of true love.

Migraine free Java SSL management

I recently had the need to turn a JAVA web application into SSL only. While the configuration is almost painless (-Dhttps.port=443 -Dhttp.port=disabled), the certificate management wasn’t quite as effective, due to a certain lack of clear documentation (where have I heard that again?).

We start assuming you already have your OpenSSL generated key/crt files, because that’s what happened here, but stay tuned:

$ openssl pkcs12 -export -in CertificateChain.pem -inkey Certificate.key -out Certificate.pkcs12 -name HostAlias -noiter -nomaciter

With this done you have a PKCS12 KeyStore you can use for the web server, much like the PEM/KEY you would use in Apache. Then, you use this configuration to properly load it:

-Dhttps.keyStoreType=PKCS12 -Dhttps.keyStore=/absolute/path/to/certificate.pkcs12 -Dhttps.keyStorePassword=KeyStorePassword

It may seem like nothing, but the keyStoreType part made the difference between a proper certificate chain and an unsigned chain localhost/localhost, which caused me major migraine for the good part of an afternoon.

With this said and done you can start the application/server and see to it that the certificate now lists itself properly and with all the needed CAs attached to it.

Self-Signed Certificate with Subject Alternative Names (SAN) [AntiFUD]

Wrangling obscure OpenSSL functions to create and publish SSL certificates has always been kind of a mess. If you want(ed) to create a valid self-signed certificate for multi domains or, at least, example.com and www.example.com, you most likely were out of luck.

There is a lot of wrong or partial documentation on the subject, but is… well… wrong and/or incomplete. It is thus time for another episode of AntiFUD.

The problem

You have multiple paths of the same website to cover for, but a single CN. If you use example.com then www.example.com will result in invalid SSL certificate, and vice versa. Suppose you have the following domain names:

  • example.com
  • www.example.com
  • *.user.example.com

In such a scenario there is no real victory no matter what you choose to use as a CN: the most used wildcard CN, *.example.com, is of no use either because it matches with www.example.com and user.example.com, but not with username1.user.example.com. The only way to address all these issues is to create and sign a X.509 v3 SSL certificate, to allow SAN. The SAN extension has been introduce to resolve all of these problems, allowing the validity of multiple domains/subdomains within the same certificate.

Creating the certificate

We have to start by creating an alternative configuration file to use with OpenSSL, and list the server names we need. As mentioned below we also have to enable the usage of v3 extensions.

# mkdir certificates
# cd certificates
# cp /etc/ssl/openssl.cnf ./example-com.cnf

We can now edit the file and adjust as needed:

[ req ]
x509_extensions = v3_ca
req_extensions = v3_req

[ usr_cert ]
keyUsage = nonRepudiation, digitalSignature, keyEncipherment

[ v3_req ]
basicConstraints = CA:FALSE
keyUsage = nonRepudiation, digitalSignature, keyEncipherment
subjectAltName=@alt_names

[ v3_ca ]
subjectAltName=@alt_names

[ alt_names ]
DNS.1 = example.com
DNS.2 = www.example.com
DNS.3 = *.host.example.com

In the default file, parameters such as req_extensions and keyUsage are commented out, while subjectAltName is missing. We have to add it to v3_req and v3_ca, and create the respective section. It can be created anywhere in the file, but it is generally appended to the bottom. Since the CN is (or, at least, should be) ignored in the presence of SAN, we insert all the names in the alt_names field.

With the configuration in place we can now create the certificate:

# openssl genrsa -out example-com.key 4096
# openssl req -new -config example-com.cnf -key example-com.key -out example-com.csr
# openssl x509 -req -in example-com.csr -CA rootCA.pem -CAkey rootCA.key -CAserial rootCA.srl -out example-com.crt -days 365  -extfile example-com.cnf -extensions v3_ca

The deviation from the standard procedure is the addition of the v3 during the CA sign. We do this by using -extfile example-com.cnf to use the custom configurations, and specifying -extensions v3_ca to make sure SAN are passed through and saved in the signed certificate.

To make sure it worked you can do the following:

# openssl x509 -in example-com.crt -text -noout
        […]
        X509v3 extensions:
            X509v3 Subject Alternative Name:
                DNS:example.com, DNS:www.example.com, DNS:*.user.example.com
            X509v3 Subject Key Identifier:
                xx:xx:xx:xx:xx:xx:xx:xx:xx:xx:xx:xx:xx:xx:xx:xx:xx:xx:xx:xx
            X509v3 Authority Key Identifier:
                xx:xx:xx:xx:xx:xx:xx:xx:xx:xx:xx:xx:xx:xx:xx:xx:xx:xx:xx:xx

            X509v3 Basic Constraints:
                CA:TRUE
        […]

The only thing left to do is to set up the certificates in the server, and everything will work as intended.

RSA/DSA ssh(d) keys, a synthetic guide

There is a lot of useless and cryptic information in regard to any type of encryption, typical as per USA’s FUD standards. I’ll post here a synthesis of the steps necessary to wave plain text password logins goodbye.

I’ll assume you already have the private/public key couple by now, if not you can use puttygen. This topic is well covered, although they have a tendency to suggest a low level of encryption. Isn’t it strange how for apparently “anybody” an 8 letter password, or a 2048 bit key, is enough for everyone? For the record, I used a 4096 bit DSA key.

I will also assume that you’re setting up a server on Linux, so ymmv.

Coming back to the topic at hand, you have a private key, that you use to login from your computer, and a public key that you will deploy to one or more PCs/servers. The public key will probably look like this:

---- BEGIN SSH2 PUBLIC KEY ----
Comment: "dsa-key-[DATE]"
[MULTI-LINE KEY]
---- END SSH2 PUBLIC KEY ----

This won’t work in most cases, as SSHD expects a certain format. You will then have to convert that key into this:

ssh-dss [KEY BROUGHT TO A SINGLE LINE WITHOUT SPACES] [OPTIONAL COMMENTS]

The beginning of the line is ssh-dss for DSA keys, ssh-rsa for RSA keys. With this line of text in hand, you can open ~/.ssh/authenticated_keys on your servers, copy the key data into it, and save.

The last thing to do is to reconfigure the sshd.

…
ServerKeyBits 1024
…
AuthorizedKeysFile      %h/.ssh/authorized_keys
…
PasswordAuthentication no
…

While checking the configuration I noticed that the ephemeral key size (ServerKeyBits) was defaulted to 1 kilobit. ONE FREAKING KILOBIT. To give you a comparison, in 2002 on IRC channels we used DH with 2048 bits of encryption. That’s 13 years ago. For chat. You might want to turn it up several notches.

For the server to actually use the key you provided, you will need to uncomment the AuthorizedKeysFile, keep in mind that the path may differ. It could be .ssh/authorized_keys on CentOS, %h/.ssh/authorized_keys on Ubuntu, so on and so forth.

AFTER you made sure you can actually log in with your DSA/RSA key, you will disable plain text authentication by uncommenting AuthorizedKeysFile and setting it to no.

This is all the black magic involved in it, without the convoluted mess that always surrounds OpenSSL/SSHD documentations.

Minty to the rescue, tales of LVM basics and recoveries

In this post I’ll document a few replicable techniques that might help the less experts in managing and recovering a faulty hard drive with LVM in use. Note: it may contain Windows and Virtual Machines.

Why Windows?

Due to my gaming and drawing habits, even though I love the freedom of OpenSource platforms, I find myself using Win7 most of the time. We could argue that in this day and age it’s not even necessary, and I would be better off with a XenServer and a couple passthroughs to run everything in parallel, and I would agree with you. But I’m also lazy, and why fix something that is not broken? In any case all headless servers expertise came to no use when I found myself having to deal with a faulty LVM of a root partition in a notebook hard drive. Sort of a jackpot, of a kind. While LVM have undoubtedly their advantages, I find myself more comfortable in the physical realm rather than the logical. So I wasn’t much of an expert in that regard, and the notebook wouldn’t properly load making all the usual on-machine troubleshooting useless. Being a linux installation I couldn’t even just plug it into my main PC and scan the extN, since I am sporting Win7 for my daily routines. But then it dawned on me…

Why not virtual Zoidberg?

Given the monstrous specs of my PC, and the marvels of virtualization and passthrough technology, I thought to put them all to use and resurrect my dusty VMware Workstation I had lying around for such a long time. While attaching the external hard drive to a USB3 port, I could simply pass-through it to the *nix virtual machine, and while at it I’d try that neat Linux Mint distro I wanted to try for so long (and hence the name of the article). At this point it becomes a simple *nix recovery, which is for the best.

Dealing with LVMs

I armed myself with what documentation I could find, and started going at it:

# pvscan
  PV /dev/sda5   VG mint-vg   lvm2 [9,76 GiB / 0    free]
  Total: 1 [9,76 GiB] / in use: 1 [9,76 GiB] / in no VG: 0 [0   ]
# lvm pvs
  PV         VG      Fmt  Attr PSize PFree
  /dev/sda5  mint-vg lvm2 a--  9,76g    0

# lvm vgs
  VG      #PV #LV #SN Attr   VSize VFree
  mint-vg   1   2   0 wz--n- 9,76g    0 
# vgdisplay
  --- Volume group ---
  VG Name               mint-vg
  System ID             
  Format                lvm2
  Metadata Areas        1
  Metadata Sequence No  6
  VG Access             read/write
  VG Status             resizable
  MAX LV                0
  Cur LV                2
  Open LV               2
  Max PV                0
  Cur PV                1
  Act PV                1
  VG Size               9,76 GiB
  PE Size               4,00 MiB
  Total PE              2498
  Alloc PE / Size       2498 / 9,76 GiB
  Free  PE / Size       0 / 0   
  VG UUID               [UUID]

# lvm lvs
  LV     VG      Attr      LSize Pool Origin Data%  Move Log Copy%  Convert
  root   mint-vg -wi-ao--- 8,76g                                           
  swap_1 mint-vg -wi-ao--- 1,00g
# lvdisplay
  --- Logical volume ---
  LV Path                /dev/mint-vg/root
  LV Name                root
  VG Name                mint-vg
  LV UUID                [UUID]
  LV Write Access        read/write
  LV Creation host, time mint, 2015-02-08 22:44:19 +0100
  LV Status              available
  # open                 1
  LV Size                8,76 GiB
  Current LE             2242
  Segments               2
  Allocation             inherit
  Read ahead sectors     auto
  - currently set to     256
  Block device           252:0
   
  --- Logical volume ---
  LV Path                /dev/mint-vg/swap_1
  LV Name                swap_1
  VG Name                mint-vg
  LV UUID                [UUID]
  LV Write Access        read/write
  LV Creation host, time mint, 2015-02-08 22:44:19 +0100
  LV Status              available
  # open                 2
  LV Size                1,00 GiB
  Current LE             256
  Segments               1
  Allocation             inherit
  Read ahead sectors     auto
  - currently set to     256
  Block device           252:1

What does this all mean? Let’s divide it for simplicity. When not dealing with physical partitions but with LVM, there are three different actors in play: physical volumes, volume groups, and logical volumes:

  • Physical Volumes: (pvscan, lvm pvs) are the classical partitions. They can be grouped into a single Volume Group to virtualize disk space and access and only handle space as a virtual entity.
  • Volume Group: (lvm vgs, vgdisplay) can be considered as a union of partitions. Just like logical volumes in RAID setups, VGs support the addition (and/or removal) of drives from it, which makes it easier to silently expand the space available without touching a partition. Suppose for example that we want an additional hard drive in our PC, we can mount the new hard drive, format it and attach it to our current VG. From there we can simply “expand” the Logical Volume(s) we want the additional space to go to, and it’s done. No need to mount partitions in directories or similar, it just becomes a de-facto stripe.
  • Logical Volume: (lvm lvs, lvdisplay) the usable “virtual” partition. These LVs can be mounted just like the good ol’ partitions, and can be used as such. If an hard drive is added to the VG we can simply expand it to make use of the new space. At the same time, we will have no need to take in accounting different mounting problems since it’s just a (possibly striped on various hard drives of different sizes) partition.

With this knowledge at hand, after understanding the concepts of LVMs, it was a matter of simply using mount /dev/<VGNAME>/root /mnt, and recover what salvageable data I had left. A question I never found myself asking (for obvious reasons) was to be asked, though: “what if the damage to the hard drive was fatal for just coincidence, and could I just fix and reuse it for less than critical events?”.

Once upon a time, in a bad block far, far away…

While everybody agrees that a bad block is a great signal for “duck and cover”, I’ve always been more of an inquisitorial type. Armed with a live Mint distro and an idiot proof documentation, I proceeded to simply do the following:

# badblocks /dev/sda > ./bad-blocks
# fsck -l ./bad-blocks /dev/sda

While reinstalling ex novo a new OS, I thought it would be helpful, in order to avoid the pesky “Unrecovered read error – auto reallocate failed” to leave a GB or two as unallocated space, for all intents and purposes. So far everything has worked fine, let’s hope and pray that it will continue to do so, but given the hard drive reassignment to non-aggressive duties, it probably will.

XenServer GrubConf.py fix script

In a previous article (Fixing XenServer error “Unable to find partition containing kernel”) I described how to fix a recurring problem after patching XenServer 6.2 installations. While the fix is known from years it’s never been adopted, and different distros (such as Ubuntu LTS 14.04) fail to boot properly when the GrubConf.py (on dom0) gets reset to its default state.

Being the lazy person that I am I decided to set up a script to do the work for me, after all we’re admins, not monkeys.

#!/bin/bash
GRUBCONF="/usr/lib/python2.4/site-packages/grub/GrubConf.py"
PATCHED=$(grep "_entry" $GRUBCONF | wc -l)
if [ $PATCHED -eq 2 ]; then
  echo "GrubConf.py is already patched"
else
  echo "Patching GrubConf.py to fix boot..."
  sed -i 's/_entry}":/_entry}":\n                        arg = "0"\n                    elif arg.strip() == "${next_entry}":/' $GRUBCONF
  PATCHED=$(grep "_entry" $GRUBCONF | wc -l)
  if [ $PATCHED -eq 2 ]; then
    echo "- Patch was applied successfully."
  else
    echo "- There was a problem while applying the patch."
  fi;
fi;
echo

This does just what I/we used to do manually: detects if GrubConf.py has been reverted and, if not, patches it up. Supplementary tests added for paranoia 🙂

Better OSSEC syslog parsing for Splunk

Just as predicted by the documentation, the syslog parsing of the OSSEC app for Splunk was a bit meh: while it would work in several instances it would terribly fail in others, like HTTP access for example. Below you can find the current version I’m using, which also provide additional fields that can be used for reports.

[ossec-syslog-message]
#REGEX = ossec:.*?(Location:.*;)\s*(user: [^;]+;\s*)?(\w{3} \d+ [\d:]+ \w+ )?(.*)$
#FORMAT = message::$4
REGEX = ossec:.*?(Location: (.*?);)\s*(srcip: ([a-f0-9:\.]+);\s*)?(user: [^;]+;\s*)?([a-f0-9:\.]+ ([a-zA-Z\-]+ [a-zA-Z\-]+) )?(\[\w{3} \w{3} \d+ \d+:\d+:\d+\.\d+ \d+\]\s*|\w{3}$
FORMAT = ossec_location::$2 ossec_srcip::$4 ossec_httpusergroup::$7 ossec_msgtimestamp::$8 message::$9

What you see commented out are the original instructions that can be safely removed. The new REGEX is more complex than the original, maybe too much, but through this I can extract more information that were previously hidden, or not easily accessible, and at the same time remove redundant timestamps while having all the important messages correctly extracted.

If you have suggestions, feel free to comment below.

OSSEC Agent/Server + Splunk installation

There is a lot of documentation to be read about the installation of OSSEC, but it’s usually sparse and focused either on a local autonomous setup or on hundreds of VMs setups. In this article we will navigate through the necessary steps to set up a small OSSEC installation with the OSSEC agent running offsite on a web/mail server and the OSSEC server running onsite. Additionally we will take a look at Splunk and install it on the OSSEC server machine, which will make it easier to manage bigger volumes of data later on.

Prerequisites

In order to compile and install OSSEC you will need build-essential on Ubuntu machines and MySQL/PostgreSQL for database support. You can read more details about this here.

Agent/Server installation

Installing the agent and the server is as easy as running the script (after checksumming it) and answering a few questions, although you should keep (most of) the defaults since they’re solid, and then build up on them.

# wget http://www.ossec.net/files/ossec-hids-.tar.gz
# wget http://www.ossec.net/files/ossec-hids--checksum.txt
# cat ossec-hids-_checksum.txt
MD5 (ossec-hids-.tar.gz) = MD5SUM
SHA1 (ossec-hids-.tar.gz) = SHA1SUM
MD5 (ossec-agent-.exe) = MD5SUM_EXE
SHA1 (ossec-agent-.exe) = SHA1SUM_EXE

# md5sum ossec-hids-.tar.gz
MD5 (ossec-hids-.tar.gz) = MD5SUM
# sha1sum ossec-hids-.tar.gz
SHA1 (ossec-hids-.tar.gz) = SHA1SUM

# tar -zxvf ossec-hids-*.tar.gz
# cd ossec-hids-*
# ./install.sh
Basic server/agent configuration

After the server configuration, you will need to manage the agents. On the server you will use manage_agents command to insert a number of agents with their ids, names and ip addresses.

****************************************
* OSSEC HIDS v2.8 Agent manager.       *
* The following options are available: *
****************************************
   (A)dd an agent (A).
   (E)xtract key for an agent (E).
   (L)ist already added agents (L).
   (R)emove an agent (R).
   (Q)uit.
Choose your action: A,E,L,R or Q:

After adding the agents on the server, you need to extract the agent keys.

Choose your action: A,E,L,R or Q: e

Available agents:
   ID: 001, Name: NAME, IP: IP
Provide the ID of the agent to extract the key (or '\q' to quit): 001

Agent key information for '001' is:
IMPORTANT_HASH

You now need to add the hash to the agent, through manage_client.

****************************************
* OSSEC HIDS v2.8 Agent manager.       *
* The following options are available: *
****************************************
   (I)mport key from the server (I).
   (Q)uit.
Choose your action: I or Q: i

* Provide the Key generated by the server.
* The best approach is to cut and paste it.
*** OBS: Do not include spaces or new lines.

Paste it here (or '\q' to quit): IMPORTANT_HASH

Agent information:
   ID:001
   Name:NAME
   IP Address:IP

Confirm adding it?(y/n): y
Added.

If you remembered to configure the firewall rules properly, allowing traffic on UDP 1514, you should now have them synced upon restart. If everything is working as expected you will find the ossec-agentd connection in the logs within /var/ossec/logs/ossec.log: ossec-agentd(4102): INFO: Connected to the server (hostname/ipaddress:1514).

Adding global agent configurations

One of the smart moves that extend the capability of OSSEC is the possibility to push configurations to the agents. Anyone who managed a botnet knows how powerful this can be, and OSSEC is no exception. Let’s suppose we’re behind a static IP, say, 1.2.3.4: by logging in through SSH, moving files through FTP and changing configuration files around we would generate a lot of white noise, but we can fix that by adding a simple agent configuration on our server side:


    1.2.3.4
  

After a reset of the OSSEC processes the agent.conf will be pushed/pulled, and the IP should be now successfully white-listed. This method also allows to set specific rules for sets of agents, by specifying the names to which the configurations apply.

Agent configuration: we need to go deeper

As explained in this article, stopping to the defaults is no good practice. While all the base scenarios have been covered, specific needs have not. Using multi-user hosting or logging? You need to add these logs manually. Mail servers? These too. For some reasons you have verbose MySQL logging? This will need to be added too. That’s easily done by simply appending the specified logs and type to either the agent ossec.conf or the server agent.conf, whichever suits your needs best:

  
    syslog
    /var/log/dovecot.log


    apache
    /var/log/domains-*.log
  

Remember that you can use wildcards and strftime for the logs, but not together. Also there are a few pitfalls in using wildcards you should be aware of.

Tweaking the server for Splunk

At this point we have a working agent/server configuration, but we want to push it a step further to make use of Splunk. Even though my setup has OSSEC and Splunk sharing the same machine I chose a syslog client configuration, and the reason is simple: through the use of syslog_output I am able to increase the granularity by raising or lowering the alert level as I see fit, while also allowing me to add a separate OSSEC server elsewhere without the need to reconfigure Splunk. It’s a win-win. The changes are to be made inside ossec.conf:

  
    127.0.0.1
    PORT_NUMBER
  

You should put the syslog_output before the <rules> tag. This is all it takes to be ready for Splunk

Where to start Splunking

Silly puns aside, we will need the Splunk software and the Reporting and Management for OSSEC. Given my setup I downloaded the deb package on the server, and the app tgz on my workstation. The installation is as easy as running a few commands:

# dpkg -i splunk---.deb
# /opt/splunk/bin/splunk enable boot-start -user splunk

On a Ubuntu server this will install the required files, and make it start on boot running as splunk user. Before running it though, we need to make a change that will allow us to receive information from OSSEC. The following code can be added in the inputs.conf after the [default] section:

[udp://127.0.0.1:PORT_NUMBER]
disabled = false
sourcetype = ossec

This will start the UDP server, as per our mission. There are other modes available if you chose not to use the syslog_output method, but I will not go into that for now, I will just leave you the app documentation as reference.

At this point most of our work is done. Once the server is started (with service splunk start in my case) you can connect to it through its web interface, which should be up at http://ipaddress:8000/ and perfectly running. After the login you can navigate to App > Manage Apps… and click Install app from file, selecting the app tgz we downloaded earlier. If everything has been done correctly data should be now flowing, and a simple sourcetype=”ossec” query should hold all the collected information.

What to do with it, you ask? Well, that’s your job now 🙂

Solution to XenServer VM landing on initramfs

In my journey through XenServer lands, I once experienced a change in the UUID of the root partition, which resulted in a failed boot and being dropped into initramfs. Although this solution should have worked just fine, I either didn’t know of it at the time or it wouldn’t work for some reason.

While inside the VM initramfs I also had the pleasure of not having any text editor of sorts: no vi, no vim, no nano. Nothing at all. Even though I found the new UUID through the use of ls -al /dev/disk/by-uuid/ (and some guesswork), I had no way to edit the grub configuration. So, after some trial and error, I came up with the following:

(initramfs) mount /dev/xvda1 /mnt; cd /mnt
(initramfs) cp grub.cfg grub2.cfg
(initramfs) cat grub2.cfg | sed s///g > grub.cfg

After the proper root partition UUID was set in place, a reboot was all it took to set the machine back up and running.

Fixing XenServer error “Unable to find partition containing kernel”

Edit: I provided a scripted solution in this article. To know why the error happens and its fixes just keep reading.

Error: Starting VM ” – The bootloader for this VM returned an error — did the VM installation succeed? Unable to find partition containing kernel

This has been the major nightmare I had so far with XenServer machines. When upgrading distros it might just so happen they will refused to boot forever after, in my case it affects Ubuntu 14.04.x, not officially supported. Let’s look at the solutions.

Modifying GrubConf.py

Although the fix is in Citrix’s repository since 2012, give or take, it has not been streamed to the executables yet for some uncertain reasons. If you open /usr/lib/python2.4/site-packages/grub/GrubConf.py at line 428 you see:

if arg.strip() == "${saved_entry}":
    arg = "0"

This causes a problem during the parsing and two lines should be added:

if arg.strip() == "${saved_entry}":
    arg = "0"
elif arg.strip() == "${next_entry}":
    arg = "0"

After the file has been modified and saved you will be able to properly start the virtual machines. This holds currently true for Ubuntu 14.04 & 14.04.1 LTS server installations, but might also work for other distributions. Also take in consideration that applying some patches to the host might revert this change, so you might need to do it again at some point in the future.

Modifying grub.cfg

This might not be enough if the problem does not relate to PyGrub but rather to the configuration file itself. While on the host machine, you can run the following command:

# EDITOR=vi xe-edit-bootloader -n  -p 1

This command will prepare and mount the drives assigned to the virtual machine, edit the boot loader configuration in vi and after quitting from vi will unmount and cleanup. If you installed Grub2 or you made mistakes in its configuration, this will allow you to edit it from inside the host machine, after which you will be able to properly boot it up.